Tip!: Images can be resized within SocialFX - however you would only really want to upload an image of roughly the right size to your blog or the image file will still be big and the blog may take ages to load. So do your cropping and resizing on your normal image/photo editing program first.
To add an image to your entry, follow these steps:
- Position your cursor at the point you would like to add your image (don't worry you can move your image around later if you aren't happy with its placement)
- The Insert Image dialog will appear -
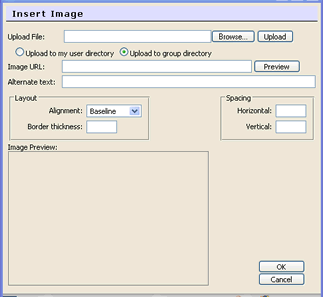
- click on the 'browse' button and find the image you want to insert
- select 'upload' - once the image is uploaded you will see a line of text in the 'Image URL' field. You don't need to worry about this - but wait until it is done before continuing..
- You can preview your image by clicking on the 'preview' button. It will appear in the Image Preview pane
- Select an alignment - to begin with either Left or Right are good as they allow the text to flow around the image nicely.
- Enter a border thickness of 1 if you want a border - otherwise leave it empty
- The spacing defines what sort of space to leave around your image - 10 is a nice buffer between it and the text. Enter 10 in both Horizontal and Vertical spacing fields.
- Select 'OK'
The image should appear. You can move it around by dragging it and resize it by finding a corner point and dragging it in or out. Don't forget to click on 'Update Html' once you have finished editing your entry.