The most straightforward way to add content to the site is to use the xinha editor. This applies both to news items and to editing content of pages. Xinha works in much the same way as standard word processors. Following is a list of functions and how to use them for the site.
 This button asks Xinha to expand to the whole screen.
 The styles here should be used to highlight page and section headings.
 This edit box, which allows you to select the font, should not normally be used – the style sheets will decide your font.
 Likewise, this box setting font size should not be used unless it’s essential.
 Bold, italics, underline and strikethrough can be used (sparingly) to emphasis when required.
 Colours for text and background are available here. In general,
background colours will be decided by the style sheets, but these can
be used to good effect to highlight cells of individual tables, etc.
Colours for text and background are available here. In general,
background colours will be decided by the style sheets, but these can
be used to good effect to highlight cells of individual tables, etc.

 Justification can be selected here. For most text, left justification should be used, with centering for major page headings.
 Numbered lists and bullet points are useful tools. Don’t worry if it doesn’t look so good in your text box – it will still probably be OK on the final html page.

 Weblink to html.
 link to file.
 Image. See full descriptions below.
 Insert or modify table – very useful. This tool brings up a new window which allows you to set table features. As a general rule, set the table border to zero thickness.


 Switch to HTML. Don’t use this tool if you’re not familiar with HTML. But if you are, this can be the most efficient way to submit information: you can assemble the page in html on your home machine, and just copy and paste into the box (but watch out for text formatting and links!).
When inserting a link, select the text to be linked and press the “Insert/Modify Link” button. This window is the result:
 you need to simply add the URL to be linked and, if required, some tooltip text which will tell the user what they are selecting. In general, select “None” as the target.
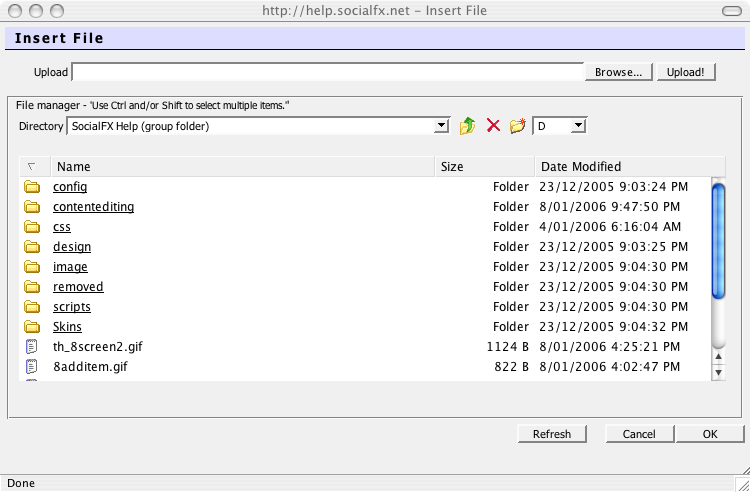
The insert link to file function requires a similar process to inserting an image. You need to
1. “Browse...” for your fill locally;
2. “Upload” and wait;
3. When the file list is refreshed, scroll down that list to look for your file – this may be more difficult than expected!
4. Click “OK”.
You file will be linked from the filename – you can change this linking text if you like.
Inserting an image is a several stage process. After bringing up the window on the left you should:
1. Click “Browse...” and find the relevant file on your local disk;
2. Select the radio button “Upload to group directory”;
3. Press “Upload” and wait a little while;
4. When the image URL is displayed as on the left, press “Preview” to see the image;
5. Select the alignment under “Layout” – selecting left and right allows text to wrap around the image.
6. Press “OK” – your image should be displayed and can be resized as you see fit.
Remember – keep images small (preferably 20 kb or less).
